Spectroscopy
Objectives
- Calibrate your spectrometer
- Record the differences between an emission spectrum and a continuous spectrum
- Identify several gases by measuring the wavelength of their emission lines and comparing to known values.
Resources
- USB Spectrometer
- Table lamp or flashlight
- Gas discharge tube power source and several gas tubes
- Online atomic spectra database (NIST)
Background
Electrons in atoms can only have certain discrete energies, but the values of these energies differ between atoms of different substances. Because the energy of a photon E=hf, the frequency photons that can be absorbed or released by these electrons when they move from one energy level to another also has values unique to each substance. Thus, measuring the intensity of photons vs. frequency emitted or absorbed be a material – its spectrum – can be used to identify it.
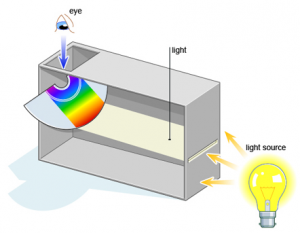
 A very simple but effective spectrometer can be made using a diffraction grating and a USB camera. A slit is placed in front of the grating so that light rays only fall on it from one direction, and the camera is placed behind the grating so that the different frequencies of light are spread out to fall on different pixels of the camera sensor. By first observing the spectrum of a known material, the pixel-to-frequency ratio of the spectrometer can be determined easily, and will remain the same as long as the positioning of the slit, grating, and camera relative to each other remains the same.
Calibrating the USB Spectrometer
- Browse to http://www.publiclab.org/signup and click “Join” to create an account. Then, browse to http://www.spectralworkbench.org, click the “Log In” link at the top of the page, enter your new username, then click “Yes” on the following page to confirm that you trust the spectral workbench site.
- Click the “Capture” button at the top of the page. The spectrum capture page will appear and ask if you want to share your camera. Answer yes.
- Point the spectrometer at the fluorescent lights in the room and press the “Begin Capturing” button. You should see an emission spectrum in the capture window of the web browser similar to the one shown below. Try changing where you are pointing or adjusting the spectrometer’s position on the camera slightly if you are not getting a good spectrum. It should look something like the image below. The software will take a horizontal slice through your image to measure the spectrum. Click the image to set the location of this slice
- Press the “Save” button when you are satisfied. Enter some sort of name (required), and for the calibration type choose “New calibration”. Save this spectrum.
- The next page will show details about your new spectrum. Press the “Calibrate” button found on this page, and follow the steps that appear in order to calibrate your spectrometer.
